Beat Lynx TH170WD
<keywords content="metal fight beyblade mfb 4d beat lynx th70wd 145wd triple height 170 track wide defense bottom tip performance hasbro takara tomy fusion masters fury shogun steel customization combo advice custom spin wiki bey balance type bb-104 starter encyclopedia expert article johannes stamina best metal wheel clear" />
| Beat Lynx TH170WD | |

| |
| Number: | BB-109 |
|---|---|
| System: | Metal Fight Beyblade |
| Type: | Balance |
Contents
Note: This Beyblade was originally released as the 'Super Rare' Bey in Random Booster Vol.7 Beat Lynx. It has been released from SonoKong as a Starter.
Face: Lynx
The Face of this Beyblade represents Lynx, one of the 88 constellations in space. It is one of the few printed Faces in the 4D lineup.
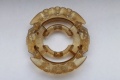
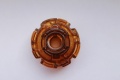
4D Clear Wheel: Lynx 
- Weight: 3.06 grams
The original release of Lynx is a translucent brown, almost tan color. Its design emulates two ears of a cat, with a notch in between each space. This symmetrical shape has good synergy when used in tandem with Beat.
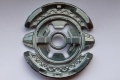
4D Metal Wheel: Beat
- Total Weight: 38.6 grams
This Metal Wheel is made up of two parts: a Core, which comprises the Metal part of the Metal Wheel, and a PC Frame.
PC Frame
The PC Frame of this 4D Metal Wheel is the piece that acts as the primary mechanism behind its Mode Change. There are triangular designs on each side of the PC Frame resembling cat ears; the weight is mainly focused on these opposite ends of the Frame.
Core
The Core of Beat could be seen as a representation of the snout of a Lynx, along with the Clear Wheel which represents its ears. There are diamond-shaped designs lining the inside of the Core that lead towards the two main protruding contact points. These protrusions produce ferocious Smash Attack, but unfortunately also create Recoil. The overarching design is similar to both Vulcan and Quetzalcoatl.
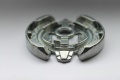
Like all 4D Metal Wheels, Beat features a mode changing gimmick. It works by rotating the PC Frame while the Beyblade is disassembled. The two Modes are:
- Attack Mode :
In this mode, the PC Frame is aligned with the two long "wings" of the Core, exposing the two protruding contact points on each side.
- Defense Mode:
In this mode, the PC Frame is rotated 90° so that the two heavier ends cover the two protruding contact points, creating a circular wall of sorts around the perimeter of Beat.
Attack Mode is the only competitively useful mode of the two. In Defense Mode, the PC Frame unfortunately leaves a small portion of the protruding contact points exposed. And even if they were covered completely, much heavier Wheels such as Basalt would still outclass it.
In Attack Mode, Beat is arguably one of the best right-spin Attack Wheels. Its best uses are in mid- and low-height Attack customizations, with mid-height being the most preferred. As a two-sided Metal Wheel, it works best with two-sided Clear Wheels such as Lynx.
Use in Attack Customization
A Metal Face, mid-height Track, and RF are the best options for reducing Beat's Recoil, and maximizing its Smash. An increase in movement speed can be attained by using the same parts, but opting for a low-track instead. Some of Beat's most popular combinations are MF Beat Lynx GB145RF and Beat Lynx 85RF.
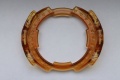
Track: Triple Height 170 
- Weight: 4.39 grams
TH170 contains a height-changing Track similar to CH120; it can change between 170, 195, and 220. Unlike CH120, TH170 has no mechanical problems that cause it to change height mid-battle, like many CH120's do.
TH170 is infinitely more versatile than 230 because of its height change ability. While 230 is easily KOed by 145-height Attack customizations due to its height, TH170 can stand up against them if necessary with the two lower heights it can change down to: 170 and 195. And it can also fare well against low-Track Attack customizations just as well as 230 can when used at the 220-height. Although, it should be noted that due to the height change mechanism of the Track, the design of TH170 is not as funnel-like and smooth as 230's is. As a result, low-Track Attackers could possibly garner more success against TH170 at the 220-height than they would against 230. This is simply one minor caveat though; TH170's outstanding ability to adapt to countless situations more than makes up for it.
In general, the 170 and 195 heights are best used against 145-height Attack and Stamina combinations, while the 220 height is best used for outspinning 230-height Stamina customs, as well as low-track Attack, Defense, and Stamina combinations.
Use in Defense Combination
On the 170 and 195-heights, TH170 can be difficult to KO for many Attackers. To optimize this ability, combine it with the following parts: MF-H, Basalt, Aquario, and RDF to create the formidable defensive opponent, MF-H Basalt Aquario TH170RDF.
Use in Stamina Customization
TH170 is one of the most popular choices for Stamina customizations due to its extremely high versatility. It can be used well in the combination, Phantom Cancer/Cygnus TH170D.
Use in Balance Combination
TH170 is a key part in the combination MF/MF-H Basalt Kerbecs TH170WF. This combination succeeds by utilizing its great momentum and versatility to perform well against all types of opponents.
Bottom: Wide Defense
| Weight: | 0.7 gram | Full Width: | 15.53 mm | Tip Width: | 14.17 mm | Full Height: | 8.92 mm | Tip Height: | 6.75 mm | Tip Angle: | 40° |
Wide Defense, as its name implies is one of the widest of the “Defense” series of Bottoms (D, SD, WD, PD, EWD). This brings numerous advantages, but also some disadvantages when compared to the other “Defense” Bottoms, specifically D. The advantages include its ability for abnormally long precession times due to its massive width that reaches the edge of the Bottom's perimeter. This allows it to wobble at a significantly larger angle for a longer period of time than D, and at a much lower spin rate. However, depending on the position of the Beyblade using WD and the spin rate of the opponent, this can be disadvantageous because of how easy it becomes to knock over the precessing WD custom. This low spin rate towards the end of the battle is created because in the process of wobbling at such a large angle, more friction is made with the stadium floor, thus decreasing its Stamina. Nevertheless, this is more often an advantage than it is a disadvantage.
Newer parts such as CS, EDS and B:D have overshadowed WD to some degree: CS and EDS due to their ability to be paired with the popular BD145 Track without scraping, and B:D because of its height and even longer precession times, but WD is still one of the best pure Stamina Bottoms available. However, when selecting high Tracks such as TH170 and 230, WD's tendency to wobble at larger angles should be kept in mind, as it's extreme precession can often become problematic.
Although the name suggests Defensive characteristics, WD does not possess any inherent defensive qualities. However, its proficiency can be increased significantly when facing left-spin Attackers through the utilization of the Weak Shooting technique.
Use in Stamina Customization
WD is arguably the best of the “Defense” series of Bottoms, and its effectiveness can be utilized in the custom Phantom Cancer/Cygnus W145WD.
Other Versions
No other versions of this Beyblade were released.
Gallery
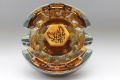
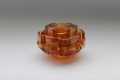
Beat Lynx TH170WD (Attack Mode)
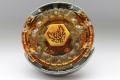
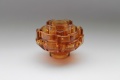
Beat Lynx TH170WD (Defense Mode)
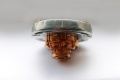
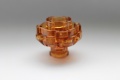
Beat Lynx TH170WD (Side View)
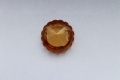
Lynx Clear Wheel
PC Frame
Beat Metal Wheel
Beat Metal Wheel (Side View)
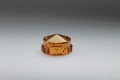
TH170 Track
TH170 Track (Side View)
TH170 Track (195 Height)
TH170 Track (220 Height)
Wide Defense
Wide Defense (Side View)


Overall
This Beyblade contains excellent parts for all Beyblade Types, which is a very rare occurrence. Beat is one of the best right-spin Attack wheels to date, comparable to VariAres or Blitz; TH170 is used to great effect in top-tier Defense, Stamina and Balance customizations and WD, despite its numerous releases, still sees use in competitive Stamina customizations. Every Blader should own at least one of this Beyblade.