Dark Bull H145SD
| Dark Bull H145SD | |

| |
| Number: | BB-40 |
|---|---|
| System: | Hybrid Wheel System |
| Type: | Balance |
Contents
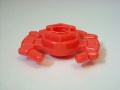
Face: Bull
The face on this Beyblade depicts a Bull, which is represented by Taurus in the Zodiac symbols. Its coloring is slightly different from its Metal counterpart.
Clear Wheel: Bull 
- Weight: 3.3 grams
Bull's original release colour is red, and features a two-winged design with two small openings between each wing. It is one of the heaviest Clear Wheels with excellent weight distribution. This makes it one of the best choices for HWS based Defense and Stamina customizations.
Metal Wheel: Dark 
- Weight: 31.4 grams
Dark has twelve spikes facing the clockwise direction. These protrusions are closely packed together with minimal space between each, resulting in an overall round shape. This shape hinders the Metal Wheel in two ways: its protrusions are not pronounced enough to provide sufficient Smash Attack, while the perimeter is interrupted too frequently for sufficient Stamina. Additionally, its weight is distributed over too large a surface area. There is thus no reason to use Dark in any competitive situation whatsoever.
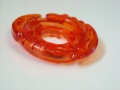
Track: Horn 145 
- Weight: 4 grams
- Height: 14.5 millimeters
H145 has two wings with two various protrusions, representing the horns of a Bull surrounding its perimeter. These four points are meant to provide Smash Attack, and they do succeed on some levels. However, because the horns are so pronounced, and because the gaps between the wings are so wide, significant recoil is produced, especially when used in combination with small Metal Wheels that allow the Horns to extend well past the perimeter of the Wheel. While H145 may not be an entirely noteworthy part as far as competitive customizations go, it is still quite a fun part to play with. You can score many impressive KO's with the smash it produces in the first few seconds of a battle, but at the same time, it's recoil does work against you in some battles, causing a self-KO or if not, a severe loss of Stamina.
IMPORTANT: Mold Variations

- Weight: 4.3 grams
H145 has two different molds. The first version's wings were not reinforced in anyway, so they were prone to breakages in some cases. The second mold which was brought into production a couple months after it was originally released rectified this problem by reinforcing the wings with a significant amount of plastic between the inside of the wings and the outside of the Track. This increased the weight of the Track to 4.3 grams, only .2 grams lighter than the third heaviest Track, GB145. The increased weight not only reduces breakages, but it also marginally helps reduce the recoil it produces.
Use in Smash Attack Customization
H145's recoil can be utilized best in combination with the extremely proficient Smash Attack Wheel Lightning, in the custom, MF Lightning LDrago H145RF. Both MF and RF help reduce the amount of recoil produced by this customization, and RF of course increases its movement speed.
Bottom: Semi-Defense

| Weight: | 0.5 gram | Full Width: | 15.65 mm | Tip Width: | 7.0 mm | Full Height: | 8.74 mm | Tip Height: | 7.75 mm | Tip Angle: | 30° |
SD is the reason to buy this Beyblade. Just as the Semi-Flat Bottom has a sharper tip than Flat, so too does Semi-Defense when compared to Defense. Before the release of SD, D was the absolute best Stamina Bottom available, but SD quickly took over the top spot, as is evidenced by the following tests:
Virgo DF145D vs. Virgo DF145SD
- Balance Stadium
- Alternating Shots
- Beylauncher
- 20 Battles
Results:
- Virgo DF145SD: 18 wins
- Virgo DF145D: 2 wins
- SD win percentage: 90%
SD is not able to wobble as much as D, so for defensive purposes, D should still be chosen over SD if you are trying to add some Stamina to your Defense custom. That being said, WD would be a better choice than D for that situation, and also arguably for Stamina as well because with the even wider tip. With it, it is allowed to circle the stadium in some situations when it is on a larger angle towards the end of a battle, thus outspinning D or SD based opponents. However, sometimes this does not happen, and SD easily knocks over the wobbling WD custom before it topples over itself.
It really comes down to personal preference when deciding whether to use SD or WD because they are so closely matched. For pure Stamina, it is impossible to tell which would win a given match, but WD would prepare you for more situations by being able to take hits better than SD. Test both and decide for yourself which one works best for what you are trying to do.
Use in Stamina Customization
SD is an excellent stamina bottom, and its effectiveness can be utilized in the custom Burn Bull AD145SD.
Other Versions
- Heat Bull D125WB - Random Booster Light Vol.3 Clay Aries ED145B (Light Blue)
- Mad Bull C145HF - Random Booster Light Vol.3 Clay Aries ED145B (Turquoise)
- Rock Bull WD145HF - Random Booster Vol.3 Stardust Pegasis (Navy)
- Flame Bull 105WB - Random Booster Vol.3 Stardust Pegasis (Powder Blue)
- Flame Bull 100F - Faceoff: Lion Gale Force Wall
- Dark Bull H145SD - Faceoff: Red Horn Uppercut
Gallery
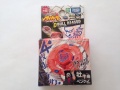
Package (front)
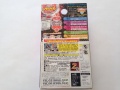
Package (back)
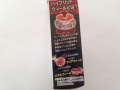
Package (side 1)
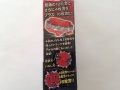
Package (side 2)


Dark Bull H145SD - Original Version
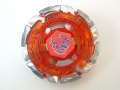
Dark Bull H145SD
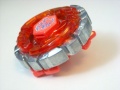
Dark Bull H145SD 3/4 view
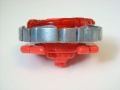
Dark Bull H145SD side view
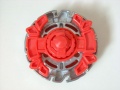
Dark Bull H145SD bottom view

Dark Bull

Dark top view
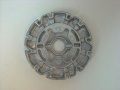
Dark bottom view
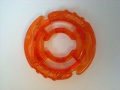
Bull Clear Wheel
Bull Clear Wheel
H145 Track side view (first mold)

H145 Track (first mold)
SD


Overall
Dark Bull H145SD does have a few noteworthy parts, but really, only one absolutely necessary part; SD. SD is arguably one of the best Stamina Bottoms available, so that alone should be reason enough to purchase one. But, there is also H145 which is fun to experiment with, and Bull, one of the heaviest right-spin Clear Wheels, which is also an essential part of almost all current Defense and Stamina customizations. Every Blader should own at least one of this Beyblade.