Difference between revisions of "Death Quetzalcoatl 125RDF"
(→4D Clear Wheel: Quetzalcoatl Image:BeywikiBannerOK.jpg) |
|||
| (48 intermediate revisions by 15 users not shown) | |||
| Line 1: | Line 1: | ||
| − | + | <keywords content="metal fight beyblade mfb 4d death quetzalcoatl 125rdf 125 rdf track rubber defense flat bottom tip performance hasbro takara tomy fusion masters fury shogun steel customization combo advice custom spin wiki bey balance type bb-119 starter encyclopedia expert article titi tithi thithi defense metal wheel clear mode change" /> | |
| − | |||
{{Beybox | {{Beybox | ||
| − | | image = | + | | image = DeathQuetzalcoatl_AttackMode.jpg |
| full item name = Death Quetzalcoatl 125RDF | | full item name = Death Quetzalcoatl 125RDF | ||
| item number = BB-119 | | item number = BB-119 | ||
| Line 14: | Line 13: | ||
==Face: Quetzalcoatl== | ==Face: Quetzalcoatl== | ||
| − | The Face depicts Quetzalcoatl, the Mesoamerican feathered serpent deity. This Face mark differs from | + | The Face depicts Quetzalcoatl, the Mesoamerican feathered serpent deity. This Face mark differs from both Metal System [[Quetzalcoatl 90WF | Quetzalcoatl]] Face designs, however. Though more closely resembling its first Face mark, this version has more colours, exaggerated traits, a more fierce design, as well as patterns in the sticker's background, inspired by the artwork of Mesoamerican civilizations. |
| + | |||
| + | ==4D Clear Wheel: Quetzalcoatl [[Image:BeywikiBannerOK.jpg]]== | ||
| + | *'''Weight:''' 2.6 grams | ||
| + | |||
| + | The Quetzalcoatl Clear Wheel is of a pale golden colour and illustrates two winged serpents with a head more like that of a cobra. Competitively, Quetzalcoatl has niche uses in Clear Wheel attack, which it does effectively to thwart opposing Beyblades of greater height thanks to the cobra heads that curve upwards, but overall, it is not necessary. It has some attack potential when paired with Flash. | ||
| − | ==Wheel: | + | ==4D Metal Wheel: Death [[Image:BeywikiBannerOK.jpg]]== |
| − | *'''Weight:''' | + | *'''Weight:''' 43.6 grams |
| − | + | The gimmick introduced in this 4D Metal Wheel is that one of the two metal parts, the Metal Frame, can be flipped to form another mode. Death has no PC Frame, only metal pieces, which makes it one of the heaviest 4D Metal Wheels available. | |
| − | + | ====Metal Frame==== | |
| + | *'''Weight:''' | ||
| + | The Metal Frame of this 4D Metal Wheel is the piece that acts as the primary mechanism behind its Mode Change. It has four small indents which act as a locking mechanism when placed on the Core. On the Defense side it has eight shallow slopes with a reptile-like texture and the large slopes of the Attack mode connect perfectly with the Core's. On the Attack side, as previously mentioned, there are eight significantly larger slopes each with the face of a serpent sculpted in. | ||
| − | === | + | ====Core==== |
| − | + | *'''Weight:''' | |
| − | + | As with any other Core in 4D, this part connects the Wheel with the Track. Its design is based on wings, so the combination of the Metal Frame and the Core indeed illustrate a winged serpent, which is the representation of Quetzalcoatl. | |
| − | + | Like all 4D Metal Wheels, Death features a mode changing gimmick. It works by flipping the Metal Frame on the opposite side while the Beyblade is disassembled. The two Modes are: | |
| − | + | ---- | |
| + | * '''Attack Mode''' | ||
| + | If Death is set in Attack Mode, the Metal Frame shows details of several serpent heads with fangs, enhancing the term "Attack". This mode is in no way more useful than Defense Mode as it does not provide sufficient Smash Attack to be of any use in Attack Type customs, and its Recoil renders it useless when compared to Defense Mode for other areas. | ||
| − | + | * '''Defense Mode''' | |
| − | + | If the Metal Frame is completely flipped to be in Defense Mode, this other side reveals a design of serpent scales, which relates to the term "Defense" and how animals defend themselves with their back, their scales, etc. Defense Mode's top half is also sloped, which reduces Recoil and is also an uncommon trait among Metal Wheels. | |
| + | ---- | ||
| − | + | Defense Mode is preferred over Attack Mode in every aspect due its much smoother design, which provides much less Recoil. Death, in Defense Mode, was arguably the first to dethrone Basalt in terms of Defensive prowess: it may not have had the weight that Basalt did, but the fact that it had much, much less Recoil made it the better Metal Wheel. Without this Recoil, Death is much harder for any Attack Type to KO or for many Stamina Types to outspin, defeating most top-tier combinations in the latter category. | |
| − | |||
| − | |||
| − | + | If the unbalanced Basalt wins because it can wobble and smash away the opponent’s spin while conserving its own rather than simply absorbing shocks, the balanced Death wins by shaving, or grinding, away the opponent’s spin instead using the relief created by the Metal Wheel's designs on the sides. While Death has not necessarily outclassed Basalt, it does earn a position as a top-tier Defense Metal Wheel. However, with the release of much heavier Attack parts such as Wyvang, Balro and Gryph, as well as defense parts like Revizer and Genbull, Death became outclassed. It can still be used to a certain extent of effectiveness in Defense, but it's nowhere near as sturdy as it once was. | |
| − | |||
| − | ===Use in | + | ===Use in Defense Customizations=== |
| − | + | Death, in Defense Mode, can be put to great use in the following [[Defense]] combo: ''MF-H Death Aquario BD145RDF''. Death’s low Recoil in tandem with the sturdy weight of BD145 and the exceptional grip of RDF form a remarkably resilient [[Defense]] customization with the ability to withstand ferocious attacks from the best Attack type customizations of its time. | |
| − | == | + | ==Track: 125 [[Image:BeywikiBannerBad.jpg]]== |
| − | *'''Weight:''' 0. | + | *'''Weight:''' 1.0 gram |
| + | The 125 Track is a midway between the 105 and the 145 Tracks. Utilized in mid-height stamina combos, it is more difficult to destablize compared to 145 height stamina combos. It has declined in popularity as the choice mid-height track due to the release of gimmicked tracks of the same height, such as T125 and D125. | ||
| − | + | ==Bottom: Rubber Defense Flat [[Image:BeywikiBannerGreat.jpg]]== | |
| + | {| class="wikitable" | ||
| + | |<font size="1"><b>Weight:</b></font> | ||
| + | |<font size="1">1.1 grams</font> | ||
| + | |<font size="1"><b>Full Width:</b></font> | ||
| + | |<font size="1">15.89 mm</font> | ||
| + | |<font size="1"><b>Tip Width:</b></font> | ||
| + | |<font size="1">14.81 mm</font> | ||
| + | |<font size="1"><b>Full Height:</b></font> | ||
| + | |<font size="1">10.20 mm</font> | ||
| + | |<font size="1"><b>Tip Height:</b></font> | ||
| + | |<font size="1">8.49 mm</font> | ||
| + | |<font size="1"><b>Tip Angle:</b></font> | ||
| + | |<font size="1">80°</font> | ||
| + | |<font size="1"><b>Tip Angle with encasing:</b></font> | ||
| + | |<font size="1">30°</font> | ||
| + | |} | ||
| − | + | RDF is an odd combination of shapes to hypothetically form a tip with both Defense and Attack abilities. This Bottom consists of a very wide plastic encasing which holds a rubber tip with a large, flat surface and a small protuberance in the middle which ends in another flat point. The rubber, which constitutes the actual tip, comes very flush with the plastic structure that contains it. In actual performance, it is similar to CS in the sense that it can have an aggressive pattern and a Defensive pattern. | |
| − | |||
| − | + | The release of RDF essentially made RS irrelevant, since it is just as effective, if not more, but also because of certain key differences. First, its superior height and better balance allows RDF to be used with the best defensive Track available at the time, BD145, without being hindered by floor scraping. Secondly, RDF has much more Stamina than RS, which was always an obstacle to the latter. | |
| − | + | When shot in a standard manner, it is stationary, much like the S tip. When weak launched, it is similar to a worn RS' movement patterns which is usually a light circling around the center of the stadium. When banked, the outer plastic part of RDF comes into contact with the stadium causing instability and erratic behavior, much like an aggressive CS, but with more grip as it has a much larger surface area of flat rubber and plastic. When contact is made with the opposing Beyblade, RDF may tilt and fall onto its outer ring and begin an aggressive movement again, before regaining balance relatively quickly. Stamina-wise, it is a tad inferior to CS and should therefore not be used for Stamina purposes. | |
| − | + | Wearing does occur with RDF, like any other rubber-based tip, and it is recommended you buy a mint one for optimum Defensive performance. | |
| − | + | ===Use in Defense/Balance Customization=== | |
| + | RDF can be utilized in the Defense/Balance customization ''MSF-H Wyvang Dragooon BD145RDF''. RDF's grip, together with the heavy weight of BD145 negates Wyvang's recoil, and provides Dragooon the balance and precession it needs to outspin opponents in the opposite direction. The result is an incredibly powerful Defense customization which can easily weather down the fiercest of attack types. | ||
==Other Versions== | ==Other Versions== | ||
| − | + | *'''Quetzalcoatl 4D Clear Wheel''' - WBBA Exclusive, Ito Yokado Event 3rd place prize (Purple) | |
| + | *'''Death Quetzalcoatl 125SF''' - Hasbro Metal Fury Spark FX Ver. (Green, reduced Metal Wheel) | ||
==Gallery== | ==Gallery== | ||
<gallery> | <gallery> | ||
| − | Image: | + | DeathQuetzalcoatlBoxFrontView.jpg|Death Quetzalcoatl Box Front View |
| + | DeathQuetzalcoatlBoxBackView.jpg|Death Quetzalcoatl Box Back View | ||
| + | DeahQuetzalcoatlBoxSideView1.jpg|Death Quetzalcoatl Box Side View One | ||
| + | DeathQuetzalcoatlBoxSideView2.jpg|Death Quetzalcoatl Box Side ViewTwo | ||
| + | DeathQuetzalcoatlBoxTopView.jpg|Death Quetzalcoatl Box Top View | ||
| + | </gallery> | ||
| + | ====Death Quetzalcoatl 125RDF==== | ||
| + | <gallery> | ||
| + | Image:DeathQuetzalcoatl_DefenseMode.jpg |Death Quetzalcoatl in Defense Mode | ||
| + | Image:DeathQuetzATK.jpg |Death Quetzalcoatl Attack Mode top view | ||
| + | Image:DeathQuetzATK-3r4 View.jpg |Death Quetzalcoatl Attack Mode 3/4 view | ||
| + | Image:DeathQuetzATK-Side V.jpg |Death Quetzalcoatl Attack Mode side view | ||
| + | Image:DeathQuetzDEF.jpg |Death Quetzalcoatl Defense Mode top view | ||
| + | Image:DeathQuetzDEF-3r4.jpg |Death Quetzalcoatl Defense Mode 3/4 view | ||
| + | Image:DeathQuetz DEF-Side.jpg |Death Quetzalcoatl Defense Mode side view | ||
| + | Image:DeathQuetz-Bottom.jpg |Death Quetzalcoatl bottom view | ||
| + | Image:Death-ATK Mode.jpg |Death Attack Mode | ||
| + | Image:DeathDEF.jpg |Death Defense Mode | ||
| + | Image:DeathFrame-ATK.jpg |Death Frame - Attack | ||
| + | Image:DeathFrame-DEF.jpg |Death Frame - Defense | ||
| + | Image:DeathCore.jpg |Death Core | ||
| + | Image:DQuetzalcoatl.jpg |Quetzalcoatl Clear Wheel | ||
| + | Image:Quetzalcoatl-3r4.jpg |Quetzalcoatl Clear Wheel | ||
| + | Image:DeathQuetz-125Track.jpg |125 Track | ||
| + | Image:RDF.jpg |Rubber Defense Flat top view | ||
| + | Image:RDF-Side.jpg |Rubber Defense Flat side view | ||
| + | </gallery> | ||
| + | ====Death Quetzalcoatl 125SF - Hasbro Metal Fury Spark FX==== | ||
| + | <gallery> | ||
| + | Image:DeathQuetzalcoatlSparkFX.JPG|Death Quetzalcoatl 125SF | ||
</gallery> | </gallery> | ||
==Overall== | ==Overall== | ||
| + | [[Death Quetzalcoatl 125RDF]] was a welcomed release in the competitive community. While Quetzalcoatl and 125 are not overly useful, Death brought a potent alternative to an otherwise Basalt-dominated Metagame, and RDF offered a great Bottom for pure Defensive customs. Duo is generally better than Death for both Stamina and Defense, however it's considerably harder to aquire in comparison, and RDF is a staple. '''Every Blader should own at least one of this Beyblade.''' | ||
[[Category:Metal Fight Beyblade]] | [[Category:Metal Fight Beyblade]] | ||
[[Category:Beyblade]] | [[Category:Beyblade]] | ||
| + | [[Category:Must-buy Beyblades]] | ||
Latest revision as of 14:20, 30 October 2015
<keywords content="metal fight beyblade mfb 4d death quetzalcoatl 125rdf 125 rdf track rubber defense flat bottom tip performance hasbro takara tomy fusion masters fury shogun steel customization combo advice custom spin wiki bey balance type bb-119 starter encyclopedia expert article titi tithi thithi defense metal wheel clear mode change" />
| Death Quetzalcoatl 125RDF | |

| |
| Number: | BB-119 |
|---|---|
| System: | Metal Fight Beyblade |
| Type: | Balance |
Contents
Face: Quetzalcoatl
The Face depicts Quetzalcoatl, the Mesoamerican feathered serpent deity. This Face mark differs from both Metal System Quetzalcoatl Face designs, however. Though more closely resembling its first Face mark, this version has more colours, exaggerated traits, a more fierce design, as well as patterns in the sticker's background, inspired by the artwork of Mesoamerican civilizations.
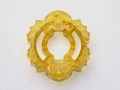
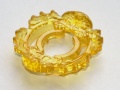
4D Clear Wheel: Quetzalcoatl 
- Weight: 2.6 grams
The Quetzalcoatl Clear Wheel is of a pale golden colour and illustrates two winged serpents with a head more like that of a cobra. Competitively, Quetzalcoatl has niche uses in Clear Wheel attack, which it does effectively to thwart opposing Beyblades of greater height thanks to the cobra heads that curve upwards, but overall, it is not necessary. It has some attack potential when paired with Flash.
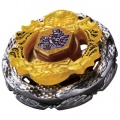
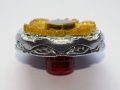
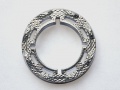
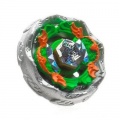
4D Metal Wheel: Death
- Weight: 43.6 grams
The gimmick introduced in this 4D Metal Wheel is that one of the two metal parts, the Metal Frame, can be flipped to form another mode. Death has no PC Frame, only metal pieces, which makes it one of the heaviest 4D Metal Wheels available.
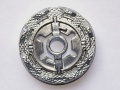
Metal Frame
- Weight:
The Metal Frame of this 4D Metal Wheel is the piece that acts as the primary mechanism behind its Mode Change. It has four small indents which act as a locking mechanism when placed on the Core. On the Defense side it has eight shallow slopes with a reptile-like texture and the large slopes of the Attack mode connect perfectly with the Core's. On the Attack side, as previously mentioned, there are eight significantly larger slopes each with the face of a serpent sculpted in.
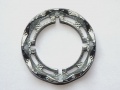
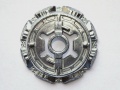
Core
- Weight:
As with any other Core in 4D, this part connects the Wheel with the Track. Its design is based on wings, so the combination of the Metal Frame and the Core indeed illustrate a winged serpent, which is the representation of Quetzalcoatl.
Like all 4D Metal Wheels, Death features a mode changing gimmick. It works by flipping the Metal Frame on the opposite side while the Beyblade is disassembled. The two Modes are:
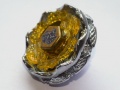
- Attack Mode
If Death is set in Attack Mode, the Metal Frame shows details of several serpent heads with fangs, enhancing the term "Attack". This mode is in no way more useful than Defense Mode as it does not provide sufficient Smash Attack to be of any use in Attack Type customs, and its Recoil renders it useless when compared to Defense Mode for other areas.
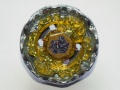
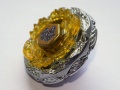
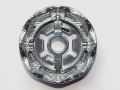
- Defense Mode
If the Metal Frame is completely flipped to be in Defense Mode, this other side reveals a design of serpent scales, which relates to the term "Defense" and how animals defend themselves with their back, their scales, etc. Defense Mode's top half is also sloped, which reduces Recoil and is also an uncommon trait among Metal Wheels.
Defense Mode is preferred over Attack Mode in every aspect due its much smoother design, which provides much less Recoil. Death, in Defense Mode, was arguably the first to dethrone Basalt in terms of Defensive prowess: it may not have had the weight that Basalt did, but the fact that it had much, much less Recoil made it the better Metal Wheel. Without this Recoil, Death is much harder for any Attack Type to KO or for many Stamina Types to outspin, defeating most top-tier combinations in the latter category.
If the unbalanced Basalt wins because it can wobble and smash away the opponent’s spin while conserving its own rather than simply absorbing shocks, the balanced Death wins by shaving, or grinding, away the opponent’s spin instead using the relief created by the Metal Wheel's designs on the sides. While Death has not necessarily outclassed Basalt, it does earn a position as a top-tier Defense Metal Wheel. However, with the release of much heavier Attack parts such as Wyvang, Balro and Gryph, as well as defense parts like Revizer and Genbull, Death became outclassed. It can still be used to a certain extent of effectiveness in Defense, but it's nowhere near as sturdy as it once was.
Use in Defense Customizations
Death, in Defense Mode, can be put to great use in the following Defense combo: MF-H Death Aquario BD145RDF. Death’s low Recoil in tandem with the sturdy weight of BD145 and the exceptional grip of RDF form a remarkably resilient Defense customization with the ability to withstand ferocious attacks from the best Attack type customizations of its time.
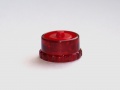
Track: 125 
- Weight: 1.0 gram
The 125 Track is a midway between the 105 and the 145 Tracks. Utilized in mid-height stamina combos, it is more difficult to destablize compared to 145 height stamina combos. It has declined in popularity as the choice mid-height track due to the release of gimmicked tracks of the same height, such as T125 and D125.
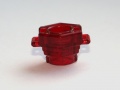
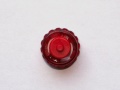
Bottom: Rubber Defense Flat 
| Weight: | 1.1 grams | Full Width: | 15.89 mm | Tip Width: | 14.81 mm | Full Height: | 10.20 mm | Tip Height: | 8.49 mm | Tip Angle: | 80° | Tip Angle with encasing: | 30° |
RDF is an odd combination of shapes to hypothetically form a tip with both Defense and Attack abilities. This Bottom consists of a very wide plastic encasing which holds a rubber tip with a large, flat surface and a small protuberance in the middle which ends in another flat point. The rubber, which constitutes the actual tip, comes very flush with the plastic structure that contains it. In actual performance, it is similar to CS in the sense that it can have an aggressive pattern and a Defensive pattern.
The release of RDF essentially made RS irrelevant, since it is just as effective, if not more, but also because of certain key differences. First, its superior height and better balance allows RDF to be used with the best defensive Track available at the time, BD145, without being hindered by floor scraping. Secondly, RDF has much more Stamina than RS, which was always an obstacle to the latter.
When shot in a standard manner, it is stationary, much like the S tip. When weak launched, it is similar to a worn RS' movement patterns which is usually a light circling around the center of the stadium. When banked, the outer plastic part of RDF comes into contact with the stadium causing instability and erratic behavior, much like an aggressive CS, but with more grip as it has a much larger surface area of flat rubber and plastic. When contact is made with the opposing Beyblade, RDF may tilt and fall onto its outer ring and begin an aggressive movement again, before regaining balance relatively quickly. Stamina-wise, it is a tad inferior to CS and should therefore not be used for Stamina purposes.
Wearing does occur with RDF, like any other rubber-based tip, and it is recommended you buy a mint one for optimum Defensive performance.
Use in Defense/Balance Customization
RDF can be utilized in the Defense/Balance customization MSF-H Wyvang Dragooon BD145RDF. RDF's grip, together with the heavy weight of BD145 negates Wyvang's recoil, and provides Dragooon the balance and precession it needs to outspin opponents in the opposite direction. The result is an incredibly powerful Defense customization which can easily weather down the fiercest of attack types.
Other Versions
- Quetzalcoatl 4D Clear Wheel - WBBA Exclusive, Ito Yokado Event 3rd place prize (Purple)
- Death Quetzalcoatl 125SF - Hasbro Metal Fury Spark FX Ver. (Green, reduced Metal Wheel)
Gallery
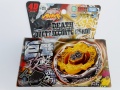
Death Quetzalcoatl Box Front View
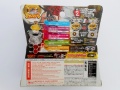
Death Quetzalcoatl Box Back View
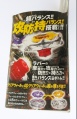
Death Quetzalcoatl Box Side View One
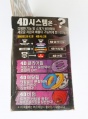
Death Quetzalcoatl Box Side ViewTwo

Death Quetzalcoatl Box Top View


Death Quetzalcoatl 125RDF
Death Quetzalcoatl in Defense Mode
Death Quetzalcoatl Attack Mode top view
Death Quetzalcoatl Attack Mode 3/4 view

Death Quetzalcoatl Attack Mode side view

Death Quetzalcoatl Defense Mode top view
Death Quetzalcoatl Defense Mode 3/4 view
Death Quetzalcoatl Defense Mode side view

Death Quetzalcoatl bottom view
Death Attack Mode
Death Defense Mode
Death Frame - Attack
Death Frame - Defense
Death Core
Quetzalcoatl Clear Wheel
Quetzalcoatl Clear Wheel
125 Track
Rubber Defense Flat top view
Rubber Defense Flat side view


Death Quetzalcoatl 125SF - Hasbro Metal Fury Spark FX
Death Quetzalcoatl 125SF

Overall
Death Quetzalcoatl 125RDF was a welcomed release in the competitive community. While Quetzalcoatl and 125 are not overly useful, Death brought a potent alternative to an otherwise Basalt-dominated Metagame, and RDF offered a great Bottom for pure Defensive customs. Duo is generally better than Death for both Stamina and Defense, however it's considerably harder to aquire in comparison, and RDF is a staple. Every Blader should own at least one of this Beyblade.